Import Indicators of compromise
To import IOCs, either enable one of the pre-integrated IOCs feeds on the Settings->Feeds Tab or add your own custom/private TAXII/STIX/MISP/CSV…etc feed, or you can import the IOCs files manually via Indicators->Add/Import Indicators->Bulk Import Indicators from File.
To enable one of the pre-integrated IOCs feeds Click on Settings->Feeds Tab, Then Enable one of the Indicators feeds, for example here we enabled the “abuse.ch Feodo Tracker Botnet C2 IP” feed, and clicked on “Update” to trigger the feed download now.
Once the import is done, you will be able to view the indicators via the Indicators Management Page by Clicking on Indicators of the left menu.

To learn how to enable custom Rules/IOCs feed, please read the custom feeds guide.
You can as well manually import the IOCs files via Indicators -> Add/Import Indicators -> Bulk Import Indicators From File.
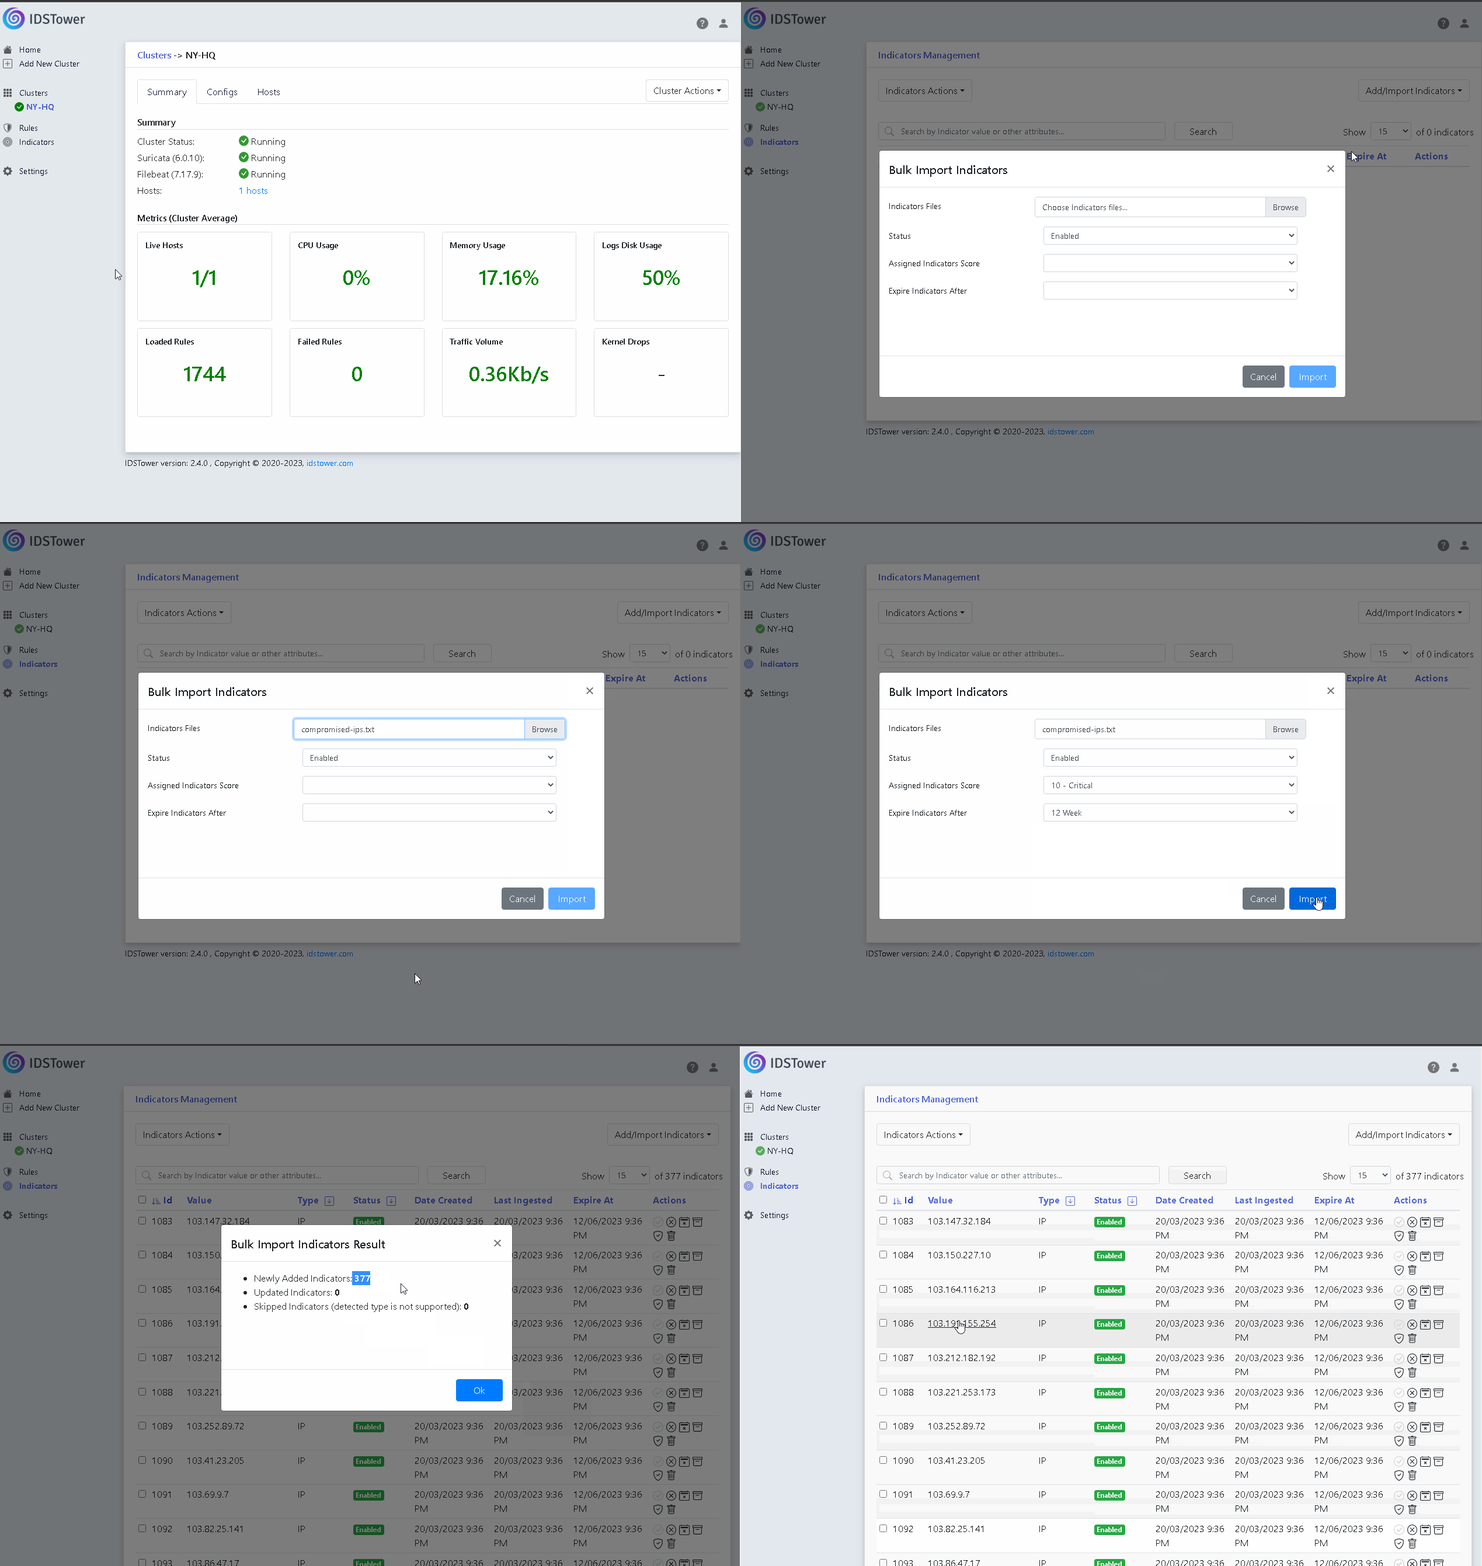
Your Suricata hosts do not receive the new IOCs instantly, each host pulls them on its next indicators update run, every 5 minutes by default plus a random start delay of up to 2 minutes, so a change lands within about 5 to 7 minutes. Once applied, you should start seeing alerts if those indicators are observed in your network.
Indicators File Format
An indicators file is plain text with one indicator per line, it has no header row and no CSV columns. The same line rules apply to the list you paste into Indicators -> Add/Import Indicators -> Add New Indicators, except that the pasted list does not treat #/// lines as comments.
# lines starting with a hash are ignored
// so are lines starting with a double slash
# a comment must be on its own line, a comment after a value is not stripped
192.0.2.10
198.51.100.25:8080
2001:db8::7334
malware.example.com
0000000000000000000000000000000000000000000000000000000000000000

192.0.2.10
Leading and trailing whitespace is trimmed from every line, and values are stored in lower case.
Blank lines, and lines starting with
#or//, are ignored.Duplicate values within the same import, including values that differ only in letter case, are collapsed into a single indicator. You can select several files in one import, they are all read into the same list.
The type of each line is detected automatically. The recognized shapes are: IPv4 (
192.0.2.10), IPv4 with a port (192.0.2.10:8080, without brackets), IPv6 (2001:db8::7334), IPv6 with a port (2001:0db8:0000:0000:0000:0000:0000:7334:8080, also without brackets), fully qualified domain name (malware.example.com) and SHA256 (64 hexadecimal characters). CIDR ranges, URLs, e-mail addresses, MD5 and SHA1 hashes are not recognized by the file import.Write an IPv6 address out in full when you append a port to it. A compressed address followed by a port,
2001:db8::7334:8080, is itself a valid IPv6 address, so it is detected as a plain IPv6 indicator and the trailing number becomes part of the address.A line that matches none of those shapes is not imported, it is reported under “Skipped Indicators (detected type is not supported)” in the import result.
A value that already exists is updated in place rather than duplicated, it is assigned the Status and Expiry Date you selected and is reported under “Updated Indicators”. The Score is the exception: it is only ever raised. If the stored indicator already carries a score higher than the one you selected, the stored score is kept, since the same indicator can reach IDSTower from several sources that rate it differently. An existing indicator that you have set to Disabled or Whitelisted is left alone and reported as skipped, unless the import changes its status.
Status, Assigned Indicators Score and Expire Indicators After are chosen in the import dialog and are applied to every line of every file in that import, the score subject to the rule above for values that already exist. The indicator source is recorded as the user name of the logged in user.
Of the recognized types, IP and IP:port indicators are deployed to Suricata through its IP reputation lists, and FQDN and SHA256 indicators through Suricata datasets. The remaining indicator types that IDSTower stores (URL, e-mail address, MD5 and SHA1, which reach IDSTower through feeds) are kept for searching, exporting and reference only, they are not deployed to Suricata.
Indicator Expiry
Every hour IDSTower marks the Enabled and Review indicators whose expiry date has passed as Expired, and with “Delete Expired Indicators” on it deletes them once they have been expired for the configured number of days.
Disabled and Whitelisted indicators never expire, whatever their expiry date, including ones disabled or whitelisted by a file import or through the REST API. The Indicators Management page shows them as “Never Expires”, and the cleanup never removes them, so they stay until you delete them.
Changing an indicator’s status sets its expiry date as follows, on the Indicators Management page and with the buttons on an indicator’s own page alike:
Expire sets the expiry date to now.
Disable and Whitelist keep the expiry date, which applies again once the indicator is enabled or put in review, as the next point describes.
Enabling an indicator or putting it in review from Expired, Disabled or Whitelisted keeps its expiry date if that is more than 42 days away, and otherwise gives it a new expiry date 42 days from now.
Between Enabled and Review the expiry date is kept.
Setting an Expiry Date
You can change when indicators expire, or make them never expire, from two places:
On the Indicators Management page, select the indicators and choose Indicators Actions -> Set Expiry…. To act on everything a search finds rather than on the rows you can see, tick the checkbox at the top of the list, then click “Select all … Indicators in Search Result”.
On the page of an Enabled or Review indicator, click the pencil next to Expires At.
Both open the Set Expiry dialog, which offers:
1, 2, 4, 6, 8, 10 or 12 weeks from now.
Never Expire: the indicator stays until you expire, disable or delete it.
On a specific date…: the indicator expires at the end of the day you pick, in your browser’s time zone. The day must be today or later.
Only Enabled and Review indicators change, because they are the only ones that expire. Disabled, Whitelisted and Expired indicators in the selection are skipped, and the result tells you how many indicators were changed and how many were skipped. To give an Expired indicator a new expiry date, enable it first.
A feed update extends the expiry date of an indicator it lists again, but never shortens it, so an indicator you set to Never Expire, or to a later date than the feed would give it, keeps that expiry. Add New Indicators, Bulk Import Indicators From File and the REST API set the expiry you give them, earlier or later.