Configuring the User-Custom Packages repository
Note
This is an Optional step, you only need to do this step if you want to deploy custom built Suricata Packages, skip this step to use official Suricata packages (available in IDSTower Cluster Setup Wizard).
Advanced Users of Suricata sometime need to use their own custom built Suricata Package that has certain features enabled or bugfix that are not available yet in the binaries provided by OISF or other operating systems repositories.
IDSTower makes installing those packages easy by providing a way to the user to use his own custom built packages, the below steps explain how to do that:-
Prepare & compile your Suricata package in “.rpm” or “.dep” format.
Note
Please make sure that the Suricata package name contains the version number, for example:
suricata-6.0.1-1.el8.x86_64.rpm
suricata_6.0.1-1_amd64.deb
Create the directory structure of the Custom repository in the IDSTower directory
$ cd /opt/idstower/
$ sudo mkdir custom
$ sudo mkdir custom/Suricata
$ sudo mkdir custom/Suricata/packages
$ sudo mkdir custom/Suricata/packages/6.0.1
$ sudo mkdir custom/Suricata/packages/6.0.1/Centos8
$ sudo mkdir custom/Suricata/packages/6.0.1/Centos8/x86_64
$ sudo cp /root/suricata-6.0.1-1.el8.x86_64.rpm /opt/idstower/custom/Suricata/packages/6.0.1/Centos8/x86_64/
Note
IDSTower will pick the appropriate package to install for the target host based on target host Operating System, because of that you will need to create a directory for each OS flavor you will deploy this package to, in the above example we will be deploying Suricata to Centos8.
Please use the following OS Codes instead of Centos8 in the example above:
Rocky Linux 8: Rocky8
Rocky Linux 9: Rocky9
Alma Linux 8: Alma8
Alma Linux 9: Alma9
Oracle Linux 8: Oracle8
Oracle Linux 9: Oracle9
CentOS Stream 9: CentOSStream9
RHEL 8: RHEL8
RHEL 9: RHEL9
Amazon Linux 2023: Amazon2023
Debian 11 (bullseye): Debian11
Debian 12 (bookworm): Debian12
Ubuntu18 (Bionic): Ubuntu18
Ubuntu20 (Focal): Ubuntu20
IDSTower create the OS Code based on the following Ansible facts: “{{ ansible_distribution }}{{ ansible_distribution_major_version }}”
If you are not sure about the OS Code for your target host, you can proceed with the a temporary one and IDSTower will show you the correct one in the installation wizard.
Make sure to place any Suricata Package dependencies in the same directory so they will be installed along with the Suricata package.
For Docker Installation Only: If you are using the Docker installation method, you need to mount the packages directory to the container, you can do this by adding the following line to your docker run command:
docker run \
   -p 80:80 \
   -p 443:443 \
   -e LicenseKey=<Key> \
   -e Hosting__URL=http://idstower.company.local \
   -e Database__Host=<database host> \
   -e Database__Name=<database name> \
   -e Database__Username=<database username> \
   -e Database__Password=<database password> \
   -v /host/path/to/custom/Suricata/packages:/opt/idstower/custom/Suricata/packages/ \
   -v /host/path/to/custom/Filebeat/packages:/opt/idstower/custom/Filebeat/packages/ \
   idstower/idstower:latest
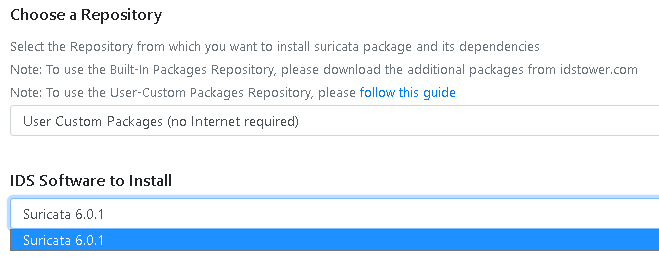
Now you will find your custom built versions available in the cluster installation wizard when you select the User Custom Packages Repository as shown below.
Note
If nothing shows up in the “IDS Software to Install”/”Logs Shipper Software to Install” dropdown menus, please make sure you have the correct folder structure in the packages directory.
